
I love my earwarmers and I wanted more
Mine is knit so I decided to make some
out of Fleece after seeing these adorable ones over

I decided to make my own
and share not only the tutorial with you but
also some patterns that you can print off
from your computer
cut out and use for yourself
For FREE
I haven't seen any other patterns floating around yet
so I am excited to share these with you.
Once you have the measurements and
patterns everything else is easy peasy
so save them, print them, cut them and get to work
What you will need:
-patterns provided by A mommy's life...with a touch of YELLOW
-1/8 yard of Fleece (1/4 does about 3)
so if you want to make them as gifts get more fleece
-pins
-pins
-1 button
-fabric scissors
-Needle
-Thread to match fleece color
-sewing machine
-glue gun and glue


There are four patterns above
The first two are for adults and teens
and the last two are for children
You are going to want to save and print the size you want
cut them out and tape the two ends together
use this as your main part of the earwarmer
trace it onto your fleece or pin it and
cut it out

You get to skip this step
Cuz I did it for you but I just wanted to show you how I got the pattern
Cuz I did it for you but I just wanted to show you how I got the pattern
I took a standard adult size earwarmer
and traced it
I really like the shape of this one
It fits my head perfectly and is flattering
Here is what I did:

1. Print all the patterns

2. Cut the patterns

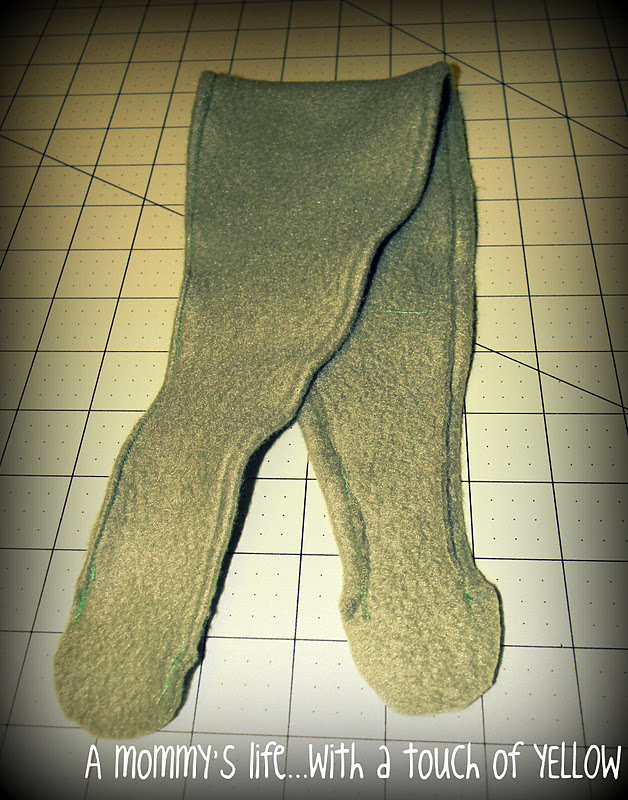
3. Next you are going to pick out your fleece color
pin your pattern to it
and cut it out with your fabric scissors

And it will look like this

4. Then you are going to want to pin your fabric on each side
you will want about a 1/4 inch seam allowance

5. Then sew with color coordinated thread
Don't forget to back stitch :)
You don't have to sew it
fleece does not fray but if you want more of a clean finished look
sewing is the way to go
It looks a little more professional and less handmade

BTW while we are talking about sewing
I am not a pro or anything
in fact I am just starting out
My only training is 7th grade TLC sewing class
so I am currently practicing and teaching myself with
the help of my mom and mother in law
(they answer all my questions as I go)
I also learn a lot from trial and error
but its fun
and I hope I get really good
Anyway for my birthday back in October
My adorable, sweet awesome hunky hubby
got me this machine for my birthday
and I am in love
I love it
and totally recommend it to anyone
Back to the earwarmers
This is what your fleece will look like after the cutting, pinning and sewing

6. Next is cutting the button hole
because it is fleece
you don't have to actually sew a fancy button hole
cuz it won't fray or rip

I just took my exacto knife and cut a slit about 3/4 an inch from the edge
and you want the slit to be about a 1/2 inch long
But to make sure it is in the right spot for your sized head
wrap it around your head to how tight or loose you want it to fit
and make a dot with a marker where the button and hole need to go
on each end

7. on the other end you will want to sew the button on
about a 1/4 inch in from the edge
again make sure to measure it to fit your head
Now you have your basic earwarmer complete
Easy Peasy right
8. Lastly you are going to want to embellish it
with whatever your cute little heart desires
I am going to give you a couple patterns
for some of the ideas I like
Circle Flower, double flower, big bow,
and star flowers
and star flowers
CIRCLE FLOWER


I decided it would be fun to do every other circle
burlap and red fleece
so I did all the odd burlap
and the even red fleece
1. cut out the pattern, trace it onto your fabric and cut them
Next to give it a worn look
I used a lighter and burned the edges
on the burlap it gave it the dark edges
and on the fleece it curled it up

2. then you are going to layer them big circle to small circle
put a cute button in the middle
and hand stitch it all together

3. Then to find the right place to put it
I wrapped the earwarmer on my head
and found where I wanted the flower to lay
held it there
made a mark where I wanted it to go
and then hand stitched it onto the fleece
through the button holes
and viola

Isn't it cute!
I love it
and I picked these colors for Christmas
but you can do any colors
and Since it is a more unique green
it doesn't have to be just for Christmas
but can be worn all winter season

BIG BOW

Next I wanted to share with you the easy big bow pattern

1. again print, cut, pin to your fabric and cut again

I did the bow in a cotton patterned fabric and the middle in fleece
I also made a couple other bows with just fleece it works
the same no matter the fabric you choose
to embellish with

2. You are going to take your first strip
take one end and fold it to the middle
take one end and fold it to the middle
secure it in place with a dot of hot glue

3. then fold the other edge over gluing it together
making the seam in the back

4. do the same thing with the smaller strip
5. Then layer them on top of each other with the smallest one on top

6. then you are going to fold them like so
This is what is going to give it the bow look

7. lastly take your fleece smallest strip and place it in the middle
and glue it so it is snug around the fabric
making it look like a bow

And here is what it will look like when you are done
cute right?!
You will do the same exact steps with the all fleece bows
again super easy
I am all about easy
just remember to slow down a little when it comes to the gluing
Why is it I always have to burn myself with every project haha

Red with striped cotton bow

Yellow and fleece bow

Grey and fleece bow

Isn't the bow so stinkin cute on
I think it is my fav
especially the grey because it goes with everything

I was a little nervous of how my earwarmers would look with my
super short hair but I think I like it
and I feel like with short hair you really do need the extra warmth
from the fleece earwarmers cuz there is no hair to cover them anymore
here is a side view with the short hair
so all you short haired sisters out there
you can pull these off too
and your ears will love you
2 LAYERED FLOWERS and
STAR FLOWERS

The three flowers on top are for the 2 layered flowered earwarmer
and the star flower on the bottom is for the star all over earwarmer

For the 2 layered flowers
1. Print, cut, trace and cut again

2. For the large flower you are going to cut out 2 big flowers
and 2 medium flowers
then layer them and hand stitch them together
3. for the small flower you are going to cut 2 more medium flowers
and 2 small flowers
layer them and hand stitch them together

4. Then remember to put the earwarmer around your head to
see where you want to place the flowers
hold them there, mark it, then stitch them to the main fleece piece

For the star flowers
1. cut, trace and cut again
(I cut 15)
2. Place them where you want them
(you can use my picture as a guide)
3. pin them in place
4. hand stitch each star on
(I used a fun yellow thread to make it pop)

Here is what the back looked like with all the stitching
and knotting

And here is what she looks like all done
This is one of my favorites on

I also did another super easy idea
1. take a strap piece of fleece in any color you would like
(You want it to be long and skinny)
2. tie a knot at the end
3. and use the twist, fold and glue technique I used here
to complete your flower
4. then tack it in place with some thread underneath the folds so you don't see it
Cute and simple

Here are all of the ones I have made so far
These are really addicting
One you make your first one
You will be able to whip these babies out like crazy
and super fast too
Plus you have the patterns so
it will take you no time
They are fun, easy and fast to make
Plus you will be so excited to wear them and show them off
and the holidays are coming up
so these would make awesome and unique gifts
seriously your mom, sisters, friends, or daughters would love these
Plus they are super de duperty cheap to make
If you have any questions never hesitate to email or comment
I hope I have given you the tools and confidence
to be able to make these fun earwarmers
Mix up the color, the embellishments and just have fun with it
It really is so much fun and you will love them when you are done


My Earwarmers and patterns are linked up here
and here
Thank you for all of your support, comments and for following
Make sure to link up your fun projects to the show and share party Tomorrow
And make sure to come check out Motivate me Monday for
health and fitness support and ideas
Link up for this weeks and read mine about running
And make sure to come check out Motivate me Monday for
health and fitness support and ideas
Link up for this weeks and read mine about running
Those are so cute. You did an awesome job. I love all your different flowers and bows. They would make perfect gifts too.
ReplyDeleteThose are great!!! And they look great on you!
ReplyDeleteThese are really one of the cutest things I've seen in a long time! I'm going to definitely yet and make some of these!
ReplyDeleteI just made some last week out of t-shirt material. Fleece of course would be way warmer. Love these!
ReplyDeleteI love these! Thank you so much for sharing the pattern. I can't wait to try it.
ReplyDeleteI'd love for you to link up and share: http://tutusandteaparties.blogspot.com/2011/12/pinteresting-link-party-week-sixteen.html
I love it! great job , I would love for you to stop over and share at http://www.getouttamyheadplease.com/2011/12/show-it-off-mondays-link-party-1.html
ReplyDeleteVery cute!!
ReplyDeleteSo cute and quick and easy. I have loads of scrap fleece to try this out. Loved your tutorial and all those choices. Thanks for sharing!
ReplyDeleteCute and cozy! I have a couple of nieces who I think would look so cute in these!
ReplyDeleteThis is so cute! I really love the ones with the bows. I am totally making one. They would make great gifts too. I think I'll find a way to work it into my DIY gift guide this season! Thanks for the patterns and tutorials :)
ReplyDeleteAmy @ www.themombot.com
you're a hot babe.. :)
ReplyDeleteso cute, fashionable, and unique! love it!
ReplyDeleteThanks for posting this! I am going to give it a try. I am also new-ish at sewing, so I like to do some new things!
ReplyDeletethese are so cute and function I love earbands I'd love you to add it to what we wore and made party over at http://raegunwear.blogspot.com
ReplyDeleteWell, these are just too cute! Love them! And you are cute as the buttons on your warmers. ; )
ReplyDeleteI'm your newest follower and would love for you to stop by for a visit!
~Abbie (www.fivedaysfiveways.com)
So cute! Thanks for sharing the patterns. Pinning this for sure. Glad to find you on the tt&j linky party :)
ReplyDeleteLike really, seriously, very cute! It is so original and I am pinning this for one day when I actually learn how to use my sewing machine:)I would love if you stopped over to link up at Get Schooled Saturday a Too Much Time on my Hands!
ReplyDeletehttp://kim-toomuchtimeonmyhands.blogspot.com/2011/12/get-schooled-saturday-3.html
I love these earwarmers. They're adorable and you can do so many different things.
ReplyDeleteRuth
Hi Whitney, these earwarmers are absolutely adorable. So creative. I hope that you have considered selling them. Thanks so much for sharing and Merry Christmas. I have recently found your blog and am now following you, and will visit often. Please stop by my blog and perhaps you would like to follow me also. Have a wonderful day. Hugs, Chris
ReplyDeletehttp://chelencarter-retiredandlovingit.blogspot.com/
The vvvymanga is a gathering place for those who are enthusiastic about manga and books, with frequent updates and a thriving community of readers and artists.
ReplyDeleteI love its rich natural look. sheep skin
ReplyDelete