

My door was looking pretty drab with a Burlap wreath on it {that is super cute BTW, but more for the fall season} and I needed something cheery and colorful to brighten it up a bit and to go with my super fun DIY door mat I made a couple weeks ago. I wanted something more inviting, that would make others smile when they walked up to my door. Plus this was super fun because it has our last name on it so people know they are at the right place when they are coming to see us.

I fell in love with these moss letters from the oh so famous Pottery Barn catalog, but hello that price really. $79 for on letter, no thank you, that price is not in the budget for this mama. So of course my mind got a turnin and I thought I could totally make on of those and so can you! Because I have a step by step tutorial for you to follow.

So lets get you everything you need and show you how I made this bad boy so that you can make one for yourself, shall we?! You will love it and it will brighten up that front door of yours.
{Supplies I used}

-11 of the big 5 gallon thicker painter sticks {I had a bunch in my garage FREE, but if you have to get them they have them at Walmart for .25 cents a piece}
-Wood Glue
-Access to a saw
-Stain {Early American}
-Rag or paint brush
-Spray Paint {Whatever color you want the main part of the door hanging to be I chose Bright Idea Yellow}
-Vinyl and a cutting machine or access to one
-Ribbon or burlap- I ended up just using plain burlap that I cut into a strip but the burlap ribbon is cute too
-Sand paper or sanding block
-Paper
-foam board {I got mine at the dollar store}
-Pencil
-Xacto Knife
-Flat sheet of moss {I got mine at Michaels for like 3 bucks}
-Hot glue gun
-Staple gun
{How I created it}

The first thing I did was make the backdrop that the monogram is going to be attached to. I knew I wanted some texture and depth to it so instead of using one solid piece of wood, I used my pallet headboard as inspiration and did something similar with the bigger, thick paint sticks. They were the perfect size and I just so happen to have some in my craft stash. I used 9 for my backdrop and 2 on the back to hold them all together.
I laid them all together and flat on the ground then I measured 12 inches and drew a line through all 9 of them so they would all be the same size. Then I marked the 2 back piece and measure them at 12.5 inches and labeled them back so I wouldn't get them mixed up.

Then I had hubby do a quick cut to each of them on the lines that I measured out. So 9 of them were cut at 1 foot and 2 were cut and 12.5 inches for the back. {Isn't he the best!!!! Always helping me with projects, not to mention super hunky}

Once they were cut I laid them all down on the ground again how I wanted them to look. I stagger them a little bit again using my pallet headboard as the inspiration. I wanted this to look shabby chic and I liked the look the jagged edge brought. Then I put wood glue on the back pieces and laid them on top of the 9 wood pieces going vertically so that it was covering each crack. I did this to two piece so each side was secure.

And it was as easy as that to get all the wood stuck together. This literally took about 8 minutes from cutting to gluing it all together.

Then you are going to want to put something heavy on top for about an hour or so, so that the glue will bond to both pieces of wood. And then your back drop is all put together and ready to spruce up a bit.

Next I got out my stain and a rag and stained the whole back drop. Then let it dry completely

While the stain was drying, I went back inside and cut some vinyl of our last name. I used my cricut mini, found the font I wanted, cut it out, and stuck it to the back drop once the stain was all dry. If you don't have a cutting machine, borrow one, order some vinyl, or you could use freezer paper to make your own stencil. You could also print it out and trace it on vinyl and cut it by hand I have done this before, and the font on this piece is big enough and not very detailed that, that would be totally possible to do.

Next, I spray painted over the whole thing with Bright Idea Yellow spray paint {of course I used yellow}, covering the whole thing and painting over the vinyl name. I did two coats letting the paint dry completely between each coat.

Once the second coat was completely dry, I took off the vinyl leaving the last name being the stain from underneath. Cool looking right?! I love the brown and yellow together, colorful yet great for being outdoors.
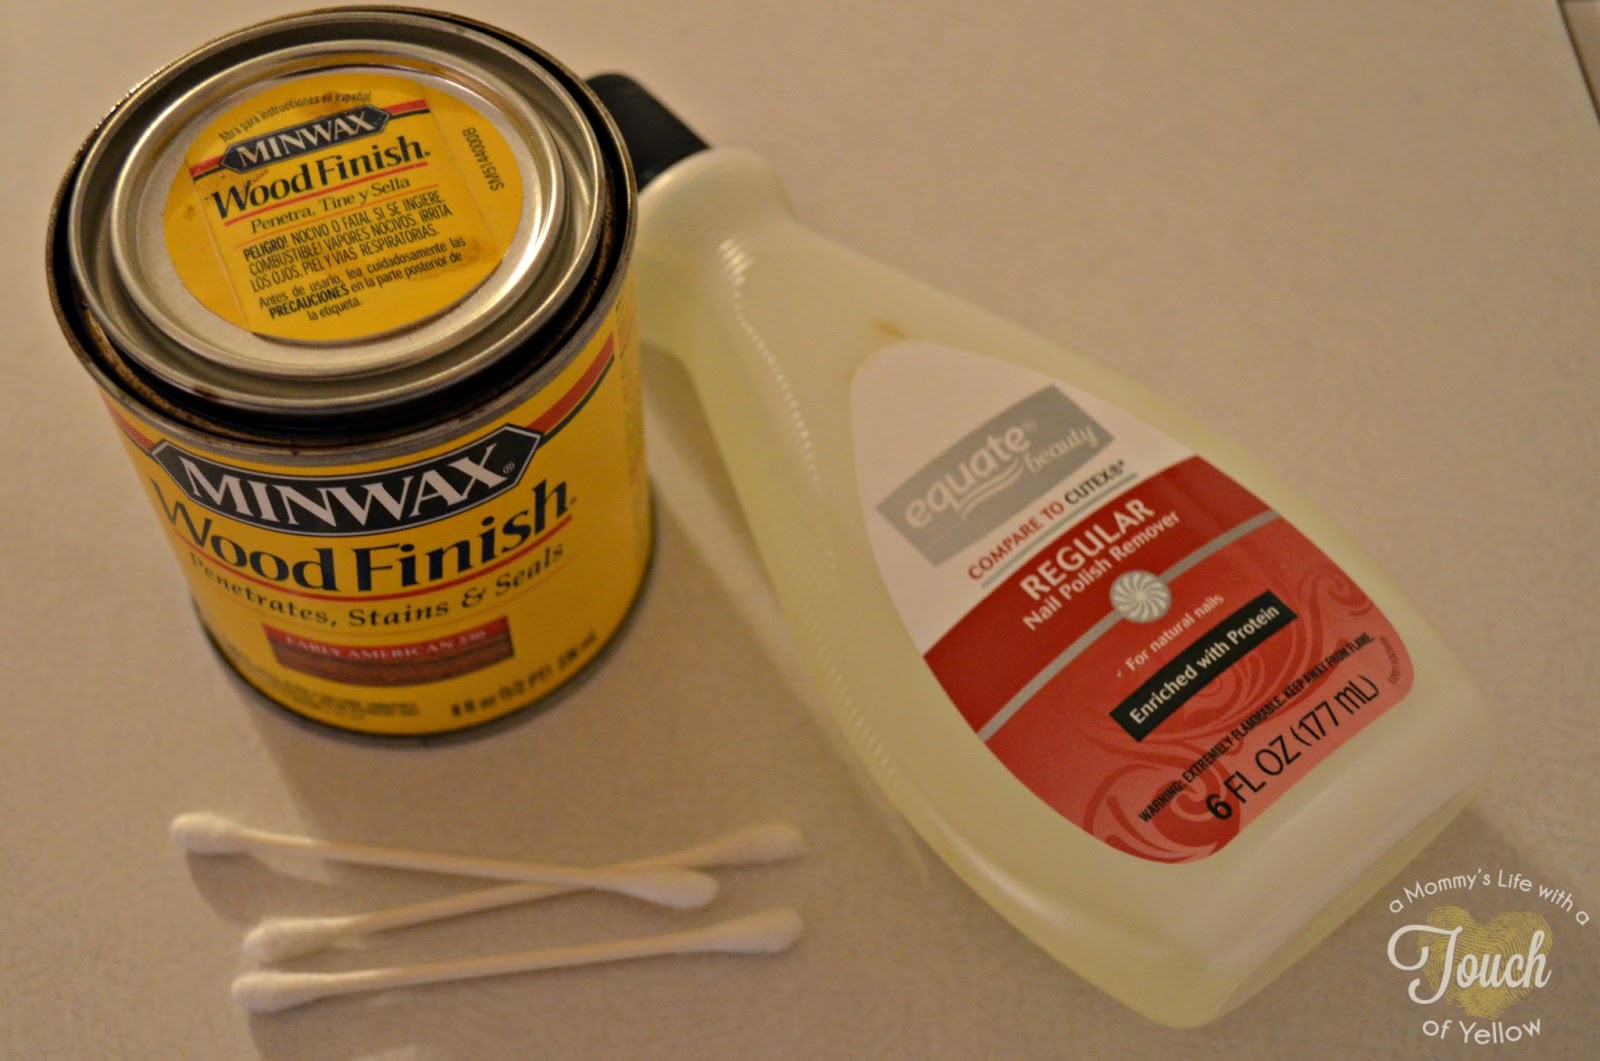
The spray paint did bleed through the vinyl a little bit, I think because I am super impatient and I applied the vinyl too soon not letting the stain completely dry so the vinyl wasn't stuck down as much as it could have been, but no worries I was able to fix it and I thought I should share how I did just in case you run into the same bleeding issue. You will need your stain, nail polish remover, and Qtips.

To get the yellow paint off that bled through I simply just soaked a Qtip in some nail polish remover and went over where the paint was not supposed to be in the letters. Then I dipped the other end of the Qtip in the stain and went over the letter again with it to get rid of the little bit of paint let on them. It worked great and ended up looking like there was no paint on them in the first place. Hola don't worry we all make mistakes I got your back.


The last thing you are going to do to the backdrop before we start making your monogram letter is going to be to sand it down a little bit.

Like I said I love the vintage shabby look so I just lightly sanded the flat surface and edges until it was the look I was going for. You can keep it as is, or sand as little or as much as you want.

Now going on to the next step of making your own moss monogram letter. This is soo easy you will wonder why anyone would pay the big bucks at a boutique.

Ok first I got back on my cricut and found the font for the U I wanted and cut it out just on some white cardstock. You do not have to have a cutting machine for this step, all you would need to do instead is print it. Find the font you want to use on your computer and print out your monogram in the font and size you want from your printer. Then just simply cut it out.

Now you are going to be using the foam board you got. I got mine from the dollar store and I only used a little corner of it. Saving the rest for some other projects I have in mind.

You are going to cut out a piece of the foam board just a little bigger then your letter with your Xacto knife. This smaller piece will make it much easier to work with.

Take your pencil and your printed out monogram and trace it onto the foam board so it looks like the picture above.

Then you are going to follow your letter cutting the foam board with your Xacto knife. Then it will look like the picture below. It will look just like your monogram you cut, or printed out just on a foam board now so it is a little thicker, which it just want we want and need to be able to cover it with the moss and give it the dimension we are wanting.

Now take your moss and lay the sheet flat face down.

Take your hot glue gun and spread glue all over the monogram and place it onto the back side of the moss sheet face down. Like the picture below.

Then you are going to cut the moss to be one inch bigger all around then your letter. You want some over hang so that you can cover all the edges as well.

Then you will start to glue down all of the edges so that the whole letter is covered and looks like so. I only got a few burns in the process but it was really simple. Just beware of the glue gun sometimes it bites.


Your very last step is going to be to add a ribbon to be able to hang it from. I simply tied a bow with my strip of burlap and then used my handy dandy staple gun to staple the ends to the back of the board so it was nice and secure. This is a really light project so I think even some hot glue would do the trick of adhering the ribbon to the board.

Then it is ready to hang and enjoy! Another easy naptime craft, what is better than that?! You and your neighbors are going to love it. I am already getting compliments on it all the time and have only had it up a couple weeks. The nice thing about this sign is you could really put it any where, on the wall, on a vintage window, part of a gallery wall, the possibilities are endless really.

Don't forget to pin this beauty!!! Sharing is caring :)

Linked up HERE
Not just a housewife, Me and My Boys, Adventures of a DIY mom,
Snap, Sew Much Ado, The Trendy Treehouse, Someday Crafts,
Nap time Crafters
Snap, Sew Much Ado, The Trendy Treehouse, Someday Crafts,
Nap time Crafters
Thank you for your support, for reading and following
It seriously means everything to me and I just love you for it.
Make sure to check out my other social media sites and follow along
{Links below}


That's so cute! You have all these creative ideas..I'd love to see a home tour on your blog!
ReplyDeleteI love love love this project!!! Theser isn't a single part of it that I don't like!!!! I am pinning.....
ReplyDeleteBrilliant idea.... :)
hugs x
Crystelle
Crystelle Boutique
Adorable! I love it! I love yellow too, am adding tons of it throughout the house right now!! Thanks for the tutorial,
ReplyDeleteKrista @thehappyhousie
Great tips! I’m going to use them right away.
ReplyDeleteAluminium scaffolding rental Dubai provides safe, reliable solutions for construction projects.
ReplyDelete