I am going to be talking a little hair fashion today. You asked for it so here it is I finally made a tutorial for my headwraps I make and wear all the time. If you follow me on Instagram {follow me @whitneyulrich} you have probably noticed my love affair for headwraps! I am a bit obsessed, they are cute, give you a little pattern and sassy in your style, and are perfect for lazy hair days. I also love these because they can be a fashion piece but also just as effective while you workout. You can be as crazy with the patterns as you want to be or you can tone it down a notch and just do some really cute solid colors, or even blacks, whites and greys.
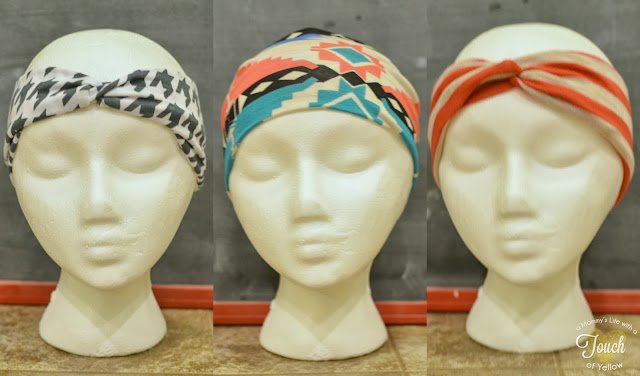
Now that we have my introduction of headwrap love out of the way, lets talk how you can make your own, fairly quickly and much cheaper. And these ones are extra special because one headwrap can be worn two different ways, as a turban or the wide band style.I was so excited when I figured out how to make these by a few trial and errors and even more excited how easy it was and how fast I could whip them out.
{Supplies Needed}
-1/4 yard knit or jersey fabric {you want these to be stretchy and comfortable} You can get these types of fabric from Hobby lobby, your local fabric stores {I have a list in Utah if you would like it let me know}, and one of my very favorites fabric.com
-Rotary Cutter and/or fabric scissors
-Measuring tape
-pins
-sewing machine or needle and thread
-thread I just used regular thread but you could use the stretchy kind if you wish
{What I did}
A quarter yard will make two headbands {so one for you and one for a friend or your daughter} so first things first cut your piece to the right length. You will cut your knit 19-21 inches long depending on how stretchy your fabric is. Knit you usually need to do a little longer and Jersey a little shorter. If you aren't sure measure your head and cut it to that length. Then your width will be the quarter yard about 9-10 inches depending on how they cut it at the store. And there you have your headwrap piece.
Then you will fold your piece of fabric in half {hot dog style if you don't know what that is long ways like the picture above} with the right sides of the fabric touching each other and on the inside.
Pin it in place I just use two to three pins depending on how much it tries to roll.
Next take it over to your sewing machine for if you don't have a machine you can hand stitch this {I did one by hand and it wasn't too bad of course it took longer but it is doable}. Just do a straight stitch on the opposite side of the fold leaving the top and bottom un-stitched. Make sure to back stitch at the beginning and end so it is nice and secure. Also when you are sewing knit or jersey it likes to get stuck in your machine because it is so stretchy so you can put it on a different stitch setting on your machine. It is still the straight stitch but it will do two stitches forward one stitch back. I believe it is just called the stretch stitch and looks like a lightning bolt. You could also use a zig zag and it should do the trick as well.
Once your straight stitch line is complete it will look like a tube with the long side secure and the short top and bottom free. You will then turn your fabric right side out.
Here comes the part that is a little tricky but if you follow the steps it isn't too bad. First lay your tube with the seam facing down.
Pick it up with one hand holding each side so it is in the shape of a U
Next turn your left wrist just a quarter turn so that the seam is facing away from you like the picture above but just on the left side.
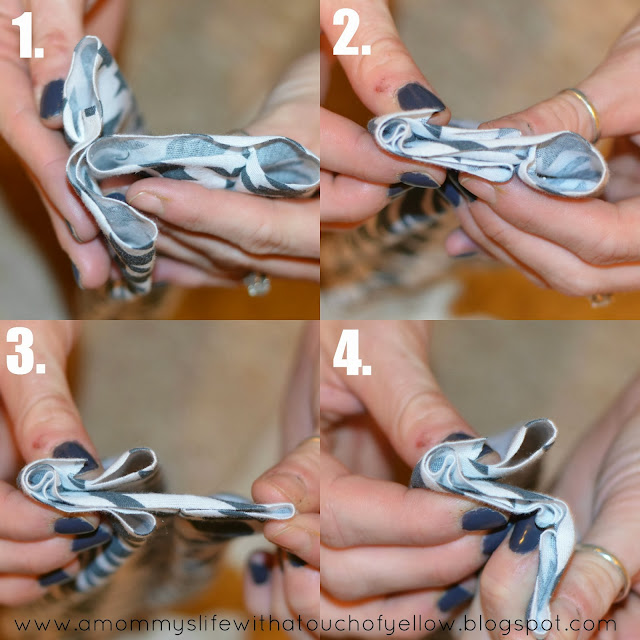
Now you are ready for the fold that makes one side a turban knot.
1. bring your left hand that you have turned a quarter turn so it is touching your right side
2. Then sandwich that left piece over the right piece
3. meeting in the middle of that right piece
4. Then you will take the extra flap and fold it over either the top of bottom making it an S with the pieces sandwiched in each other.
Then it will look like this kinda jumbled mess. Take this over to your sewing machine and sew a straight stitch right along that little S we just made. This can also be hand sewn if needs to be. And don't forget your back stitching.
Next cut off the extra so that it is really close to your seam. This is to get rid of that extra bulk that we do not want.
Lastly you will turn it right side out and you have your headwrap/Turban wrap in one. All done. Not too bad right? Once you make one you will have the hang of it and will want one in every color. This should only take you 15-20 minutes {maybe longer the first time} and only costs about $1.50-$3 per headwrap depending on how much your fabric is {don't forget to use your coupons}.
One headwrap two different styles.
So so fun and so many different styles. These would also be such a great gift and I believe Christmas is coming up really quickly.
This is too prove I was not lying when I said I wear them all the time! You will be in love and can spend more time on others things rather than your hair. You can thank me later lol. But really, try one out and let me know what you think. They are fun to just change it up every once in a while. They go great with the fall and winter fashion coming up. I hope you enjoyed this tutorial make sure to pin it for later and for others to see. Originally posted HERE as a fashion contributor.
Don't forget to follow me on Instagram
@WHITNEYULRICH
to see all my fun pics, my real life, fashion ideas
and sneak peaks of what I've been working on
Thank you for your support, for reading and for following
Make sure to check out my other social media sites and follow along
{Links below}


Cute! These might inspire me to dig the sewing machine out of the back of the closet!
ReplyDeleteThese are so fun! Thanks for sharing!
ReplyDeleteLove this idea and it looks so simple to make! Pinned.
ReplyDelete