Showing posts with label Bedroom. Show all posts

Thursday, April 18, 2013

DIY Pallet Headboard {tutorial}


This weekend I am at Snap Conference! I am so excited! You can follow along my adventure by following me on instagram. But I am not gonna leave you hangin just because I am out of town for a bit. No Way! I have a super awesome post for you today. This is on my top list of favorite projects I have ever done. So be warned its pretty awesome!

Remember this amazing Headboard that had a debut on Studio 5, HERE and HERE and on my anthropologie bedding post last month, well it is finally time to show you how we made it. I am so excited, to share. I have gotten emails, messages, and comments asking how I made this and even if I would consider making them for others. Cool right?! But the best part is it was so easy and you could totally make your own and finish it in just a weekend. Not to mention it only cost me about $25 to make by using things we already had, my resources and sales!!!


{Supplies Needed}

-2 pallets {Free}
-5 4foot 2by4s {I got mine in the sale section of home depot for only $1 a piece}
-Crowbar
-Hammer 
-Nail gun and compressor / or just hammer and finishing nails {borrowed}
-Stain {Early American}
-White paint
-Water
-Paint brush
-Rag
-Sander and Sandpaper 
-Hangman system {large holds up to 200lbs}- $13

{How we made it}

-Very first step after you get all your supplies is to pry apart your pallets. This is where you get the hubby's muscles to help you out. I did try to do a few and was able to do it but took me way longer than my hunk of a man. So thankful he is willing help me with my crazy projects. Here is were you are going to use your crowbar and hammer. Slide the bar between the nail and wood and hit it with the hammer until the nail come loose, then pull out all the nails. Then I left the nail holes because I loved the shabby chic look it gave. So much character in this piece! ahhh I just love it. Continue to pry the pallets apart until you have all the wood you need.


-Once I had all the wood pieces I needed {I used a total of  22 different sizes of pallets} I laid them out on the ground exactly how I wanted them to be up on the wall. I pieced them together randomly with no rhyme of reason and left the edges raw and jagged. Again I love the character of it. When I laid it out it measured at 88 inches wide by 43 inches tall. which we are putting behind our queen sized bed, but this is big enough to also go behind a king.


-Now it is time to  attach all the wood together. Originally we were going to use wood glue and clamps to attach all the wood together but that was just way too much work, then we thought we could glue it all to the back of a big piece of wood the same size of the pallets, but that would cost more than we wanted.  So then we thought of the above plan to use five 2by4s going vertically this would keep all the wood tight together and was super strong and cheap. We were going to use three 2X4s but then the middle one wasn't covering all the cracks, so then we cut up the third piece into smaller pieces {See below} and covered each crack so it was super strong and indestructible.


Perfect plan ended up working and for sure the thriftiest way to go.
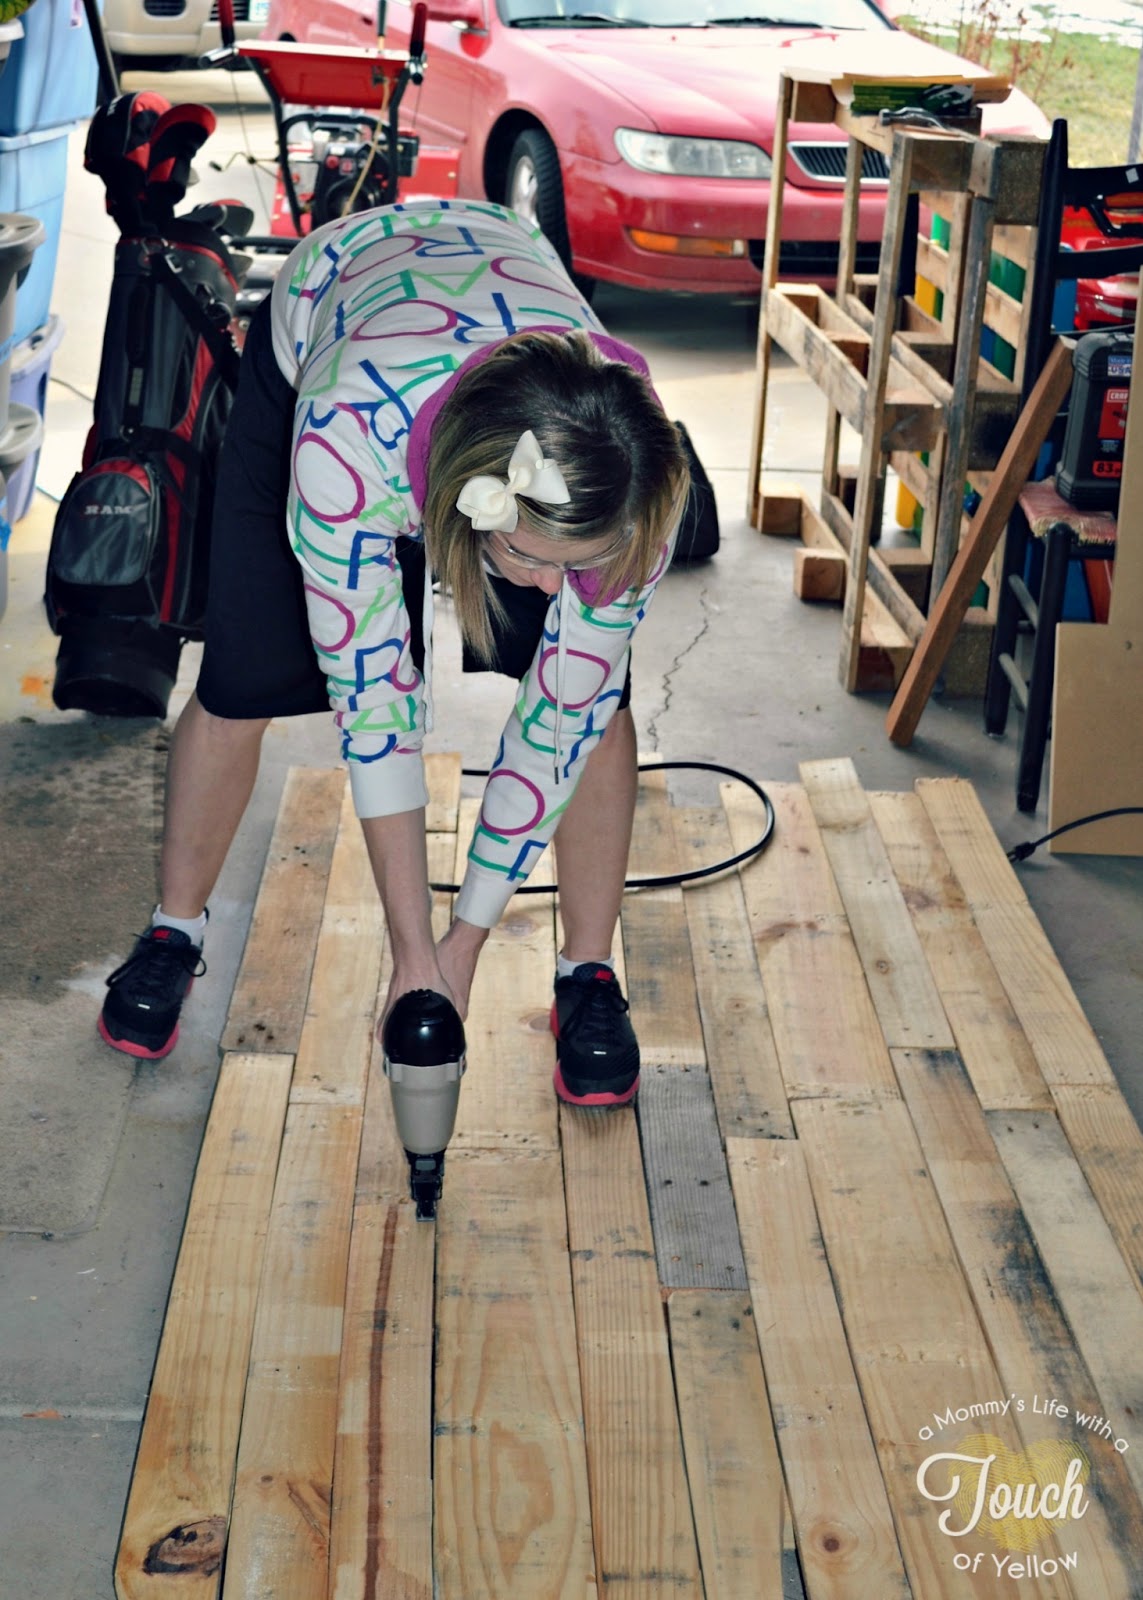

Then we just used the nail gun and compressor to attach the 2by4s to the pallets. You could also do this with a hammer and finishing nails. We had access to the compressor and it made it so much faster so if you can borrow one.


So here is the view of what the back should look like


Bam! Simple as that you have your headboard all put together. The hardest part is done. Now all that is left is beautifying it.Next you are going to take your sander and go over the whole thing with 220 grit sandpaper and then go over it again with 100 grit. This will make it super smooth, and all ready for painting.


-Next step is to stain this bad boy. This went so fast. Just brush it on all your boards, let it sit for about 15 minutes then take a rag and wipe off the access. I did the boards randomly different shades, using more stain on some and less on others. Again this was super random no pattern to it. Then you are just going to let your stain dry for at least an hour before you go onto the next step.


Now onto my favorite part, that I feel like really gave it the look I am totally in LOVE with, the whitewash technique. To read my full tutorial on how to white wash go to my post HERE. But here is a quick rundown. First make your whitewash by using one part paint to 2 parts water. Then you are going to brush it on, one board at a time, with a paint brush and then take a rag and spread it around on each individual pallet board. Again I wanted each board to have its own look so I did 1 coat of whitewash on some, 2 coats on some, 3 coats on some and even 4 coats on a few. Again I did this random so it looked antiqued.


Let your whitewash dry over night and you are done!!!! All you have left it hanging it up above your bed!!! Ekk. I was so excited and so in love at this point.


Why yes I even kissed it when we were done. I love when project work out, and when they are even more amazing then what you could have imagined.


-Ok, Here is the very last step, installing your hangman system to the back of the headboard. Seriously these are the best and the way to go for all your heavy wall projects. First we added a 2by4 to the top of the headboard, because the screws are too long and would go through the headboard without this extra piece. Installing is as simple as drilling the wall piece to the wall and the other piece to the project. Seriously it is that easy.


Then hang it up!!!! Sit back and admire your work. I sure did. It really was easy and we got it done in a weekend.


Our room makeover is slowly coming together. I just have a few more projects to finish before the big reveal and tour of the whole room.


Pin it!


Linked up HERE

Check out More of our master bedroom projects


Thank you for your support, for reading and following
Make sure to follow along on my other social media sites 
I would love to follow back 
{Links below}

Twitter Subscribe Pinterest Facebook Etsy Shop Follow on Bloglovin Instagram Contact Me

Tuesday, April 9, 2013

Stenciled Wall Backdrop {Cutting Edge Stencil Giveaway}


I love sharing projects that both renter and home owners can do. I am renting right now and even though I know there is much more I can do when I own a home I was sick of waiting to have my own home to do things. So I got creative. This one is one of my favorites because it is the perfect pop of color and pattern to bring into a room without it doing anything permanent to your wall. Thanks to Cutting Edge Stencils I was able to make this awesome backdrop to put into my room. I will be putting a few things {pictures, frames, decor, etc} on it later so make sure to come back and see how I utilize this space even more. The master bedroom is coming together. Slowly but surely, it is exciting, fun, I am loving it and can't wait to show it all to you soon. This backdrop just got me even more excited to bring it all together. So lets get to how I made this and how you can do your own to bring in a little color and fun into your space.

{Supplies I Used}

-Cutting Edge Stencil {Herringbone Allover Stencil}- $39.95
-70 inches by 45 inches and a 1/4 inch thick piece of wood {Home Depot} $20 for a bigger piece we cut down and used for other projects as well
-Paint roller
-2 colors of paint {I used white (better home and garden) and yellow (behr)} we already had both colors from other projects
-Paint tray and disposable liners {Loves these and recommend them for all painting projects}
-Easy Tack {Michaels-make sure to use your coupon}
-painters tape
-Hangman system {for up to 60lbs} about $7 at home depot
-Wood glue
-Small piece of wood


Cutting Edge Has hundreds of stencils to choose from seriously they have such a variety of styles that you will sure to find the perfect one you are looking for for your space or project. I fell in love with the Herringbone Allover stencil right away but I really liked so many of them. They are so beautiful and different. They also have them for a variety of uses. They have allover, craft and furniture, wall decals, ceiling medallions, holiday, borders and so much more. Also I LOVE how the sheet that comes with the stencil has a little QR code in the corner to scan with your smart phone and it brings you right to an instructional video right there on your phone, how sweet is that?! Right!

{What I did}


-The very first thing I did was paint the whole piece of wood white. It already came primed so that was awesomeness! I just rolled it one evenly and I did two coats to make sure it was all covered and even.


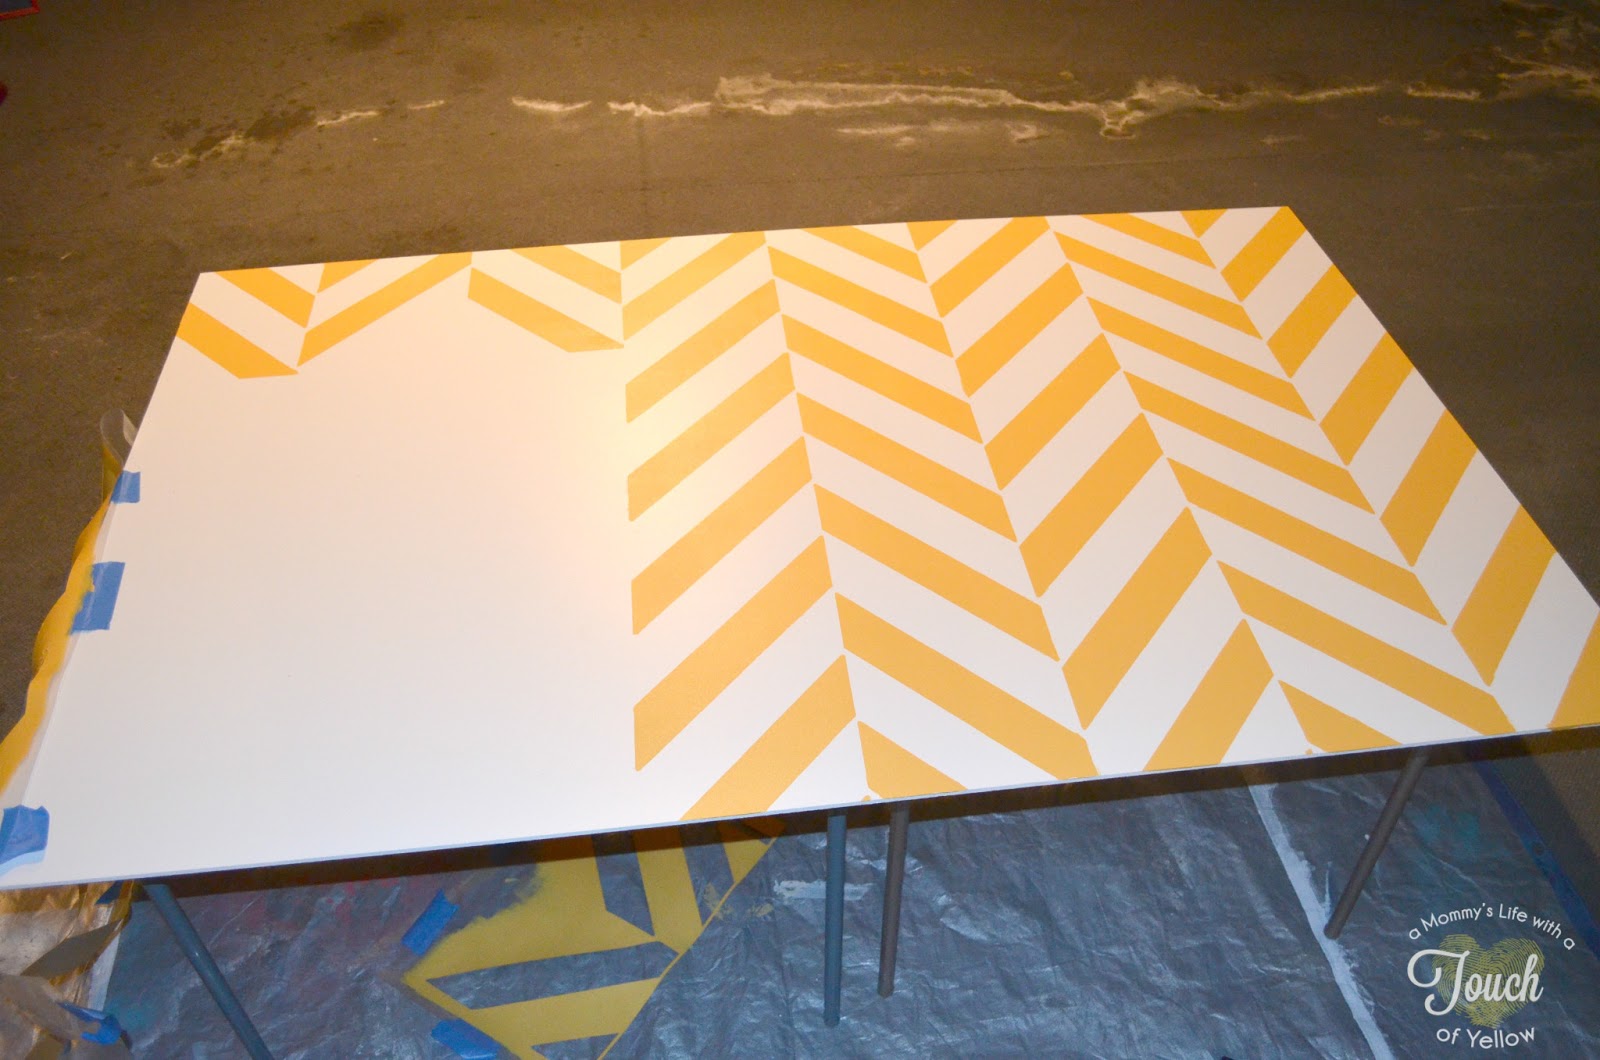
-Once the white paint was completely dry I found the middle of the board and marked it so I knew where to start. I wanted to start this particular stenciling project in the middle and work my way out toward both sides so that it is all even. On a wall you would just start on the top corner and move your way across the wall. The best tip for doing it as a back drop is start in the middle or it wont look even. Also when you get their stencils they come with a top stencil and a full stencil. We are going to start by using the top stencil and doing the whole top of the board first. The top stencil is smaller and it gives the top of the board or wall the finished look you are wanting.


-Now it is time to start stenciling. These stencils are so high quality. They are thick, durable and can be used over and over a million times. This is great too because they don't bleed. But because I am crazy I wanted to use the easy tack to make sure it stayed down on the board really good and there was little to no chance of bleeding.


 You will then grab your Easy tack and lightly mist the back of the stencil, then let it dry for about a minute. Once it is no longer wet, but tacky you are ready to put the stencil down on the board {or wall if that is what you are doing}.


Make sure to use the mark you put on the board to show the middle of the board to get your first stencil centered and even. You will want that first one to be just right so that all the stenciling following will have a clean crisp straight line to go from.The Easy tack will make it so the stencil sticks to the board temporarily, but comes off easily when you are ready t take it off. This was the first time I had used this stuff and I loved it!!!

Ok once it is all tacked down you are going to take your painters tape and tape a small piece on each side of the stencil to make sure it stays in place and has no chance of moving while you are painting over it.


-Now we are ready to paint!!! Wahoo! This is the exciting part. And actually goes really smoothly You will get into a good groove and won't want to stop just to warn you. Because each time you take off the stencil you get so excited to see what it looks like and you just want to see the finished product. Maybe that is just me I am kinda impatient like that.

Pour your paint into your tray, Roll your small roller in it making sure you get the whole roller covered in the paint then you are going to very lightly roll it onto a paper towel {don't skip this step or you will have too much paint on the roller and it could bleed} this will get all the paint evenly distributed around the roller which will make your color go on evenly. Then you will start to paint.


Roll over the stencil, making sure to roll all in one direction and leaving your roller on the piece of wood until you are done, you are going to push on the roller with medium pressure. You don't want to push too hard or you will get weird lines and it is more likely it can bleed. If you don't have the full coverage you want after rolling over the stencil, let it dry for a minute and then do another coat. The paint with dry enough for another coat pretty quickly. I did two coats on each stencil, because I had yellow so it covers a little lighter and I wanted it to be a crisp full coverage.


After you have the desired coverage you are going to lift the right side corner off of the board/ wall and then gently and slowly pull up the rest of the stencil. As it comes up you will see your beautiful clean, crisp lines. I can't even tell you how excited I was when I took off that very first stencil and saw underneath. It looked AWESOME and it made me so excited to keep going.
 

Now it is time to go onto the next one. I was way too impatient to let it completely dry to go on to the next since that would take forever and I didn't want to smudge any paint so I brought out my very favorite paint tool. My handy dandy hairdryer! What you don't blow dry your paint projects to get them to dry faster? you aren't as impatient as I? Well it is my very favorite little secret, so you should feel very special that I shared it. It worked like a charm. Blow dry it for like 1 minute and it is ready to be over lapped to start onto your next stencil. Holla!!!


Like I said I started in the center with that small top stencil and then worked my way to the right to the edge and then I went from the middle back to the left. Then the whole top of the board is complete!!! Even, looks great and is ready to start on the Big daddy stencil!


Again you are going to start in the middle, overlapping a little bit, use the Easy tack on the back, re-spraying about every other stencil, tape it down and start painting away again. Doing 2 coats, lifting the stencil, blowing it dry and working your way to the side, repeat, repeat, repeat. until the whole board is complete!!!! Hey that rhymed :)


Do you see it!!! How exciting...sooo close to being done.


At the end I did something to mess something up, I think I was getting tired at this point since it was oh 11 pm, and I was probably high from all the paint fumes in my garage, and I lined it up a little off at the very end. I thought I had messed up the whole thing, then after my complete melt down, my sweet husband assured me my hard work would not be a waste and we would be able to fix it and he was right. It was just one stencil that was off so I was able to tape it off and re paint a few spots. Praise the heavens it worked out. Seriously it was all so easy and went so smooth, until I started falling asleep. So I recommend actually taking a break when you do this so you can think haha. Yay for it still working out and finishing up beautifully, and yay for my amazing husband.

There are also so really great tip and tricks on the Cutting Edge website for when you are doing this to a whole wall. 


Alright now your board is all stenciled and dried. So now we want to be able to hang it up on the wall with the amazing hangman system that i got from home depot This is the best thing to use to hang huge things on the wall {I also used it for my pallet headboard and talk about it HERE}. To do that you are going to need a small piece of wood just big enough for the hang man to attach to. The reason you need to put this on another piece of wood is because the backdrop wood is too thin and the screws would go right through it.


You are going to measure the middle of the back of your board again and mark it, then take your wood glue and spread it all over the small piece of wood. Place it at the top, middle of the board. And clamp it down until the wood glue is completely dry. 


Then you are going to follow the directions on the back of your hangman system and attach this bad boy up on the wall!


Now this beaut is all ready to either keep as is, or like I said I am working on some fun decor to put on it, coming to the blog soon! I am in love with how it turned out and it really was so easy. This was my very first stenciling project and I feel like it went great! There were little things and yes the melt down but it didn't last very long, had a few touch ups and now it is perfect!


Fun , Easy, fast and beautiful! I love love love how I am going to be able to take this with me when we move since it isn't permanent. Yes, renters this is the project for you, if you want that stenciled look in your space.  Oh don't mind my dresser that has no knobs on it. LOVE the dresser still working on the hardware :)


Another fun and non traditional Wall stencil project I did recently with the same herringbone cutting edge stencil is this boring plain Ikea door mat that I turned into beautiful custom awesomesness. You can find the tutorial HERE.

Ok ok now that I have shown you two things you can do with a cutting edge stencil I know you are dying to have one of your very own, because really the possibilities are endless! So the amazing Cutting Edge Stencil company is giving away any of their stencils up to $50 to one of my AWESOME readers! I am sooo excited and just really wanted to say thank you to you all for your support and for all the amazing feedback I get from you each day.

Now to ENTER simply fill out the rafflecopter below!
GOOD LUCK!

a Rafflecopter giveaway
 
Thank you for your support, for reading and for following along.
Don't forget to follow me through my other social media sites
{Links to all below}

Twitter Subscribe Pinterest Facebook Etsy Shop Follow on Bloglovin Instagram Contact Me

LinkWithin

Related Posts Plugin for WordPress, Blogger...
Pin It button on image hover